Quick Overview: AutoText is one of Outlook’s most useful time-saving tools, giving you a fast way to insert reusable email content without retyping or copying and pasting. In this post (with video), you’ll learn how to create and organize AutoText entries, use them with shortcuts, and quickly automate common email responses in Classic Outlook.

If you ever feel like you’re typing the same phrases, instructions, or paragraphs again and again in Outlook, you’re not alone. Whether it’s a customer service reply, agenda outline, or a project update, all those repeated messages can add up—fast. Fortunately, Classic Outlook has a built-in feature that can save you minutes each day and hours each month: AutoText.
AutoText is part of Outlook’s Quick Parts tools and gives you the ability to store and quickly insert reusable content, everything from short snippets to full paragraphs, complete with formatting, hyperlinks, and even images. Once you start using it, you’ll wonder how you ever worked without it.
Note: AutoText is currently only available in Classic Outlook for Windows. It hasn’t been added to New Outlook or Outlook for the Web yet.
To learn more about creating Outlook AutoText entries, check out this video or continue reading.
What AutoText Can Do for You
Think of AutoText as your personal library of ready-made content. Instead of retyping or hunting through old messages to copy and paste, you can insert your saved text in a few clicks, or even faster with AutoComplete or a keyboard shortcut.
Use AutoText for:
- Customer service replies
- Proposal or quote language
- Meeting logistics
- Instructions or onboarding steps
- Common follow-up messages
- Marketing or HR templates
You can use multiple AutoText entries in the same email, something you cannot do with Outlook signatures.
How to Create a New AutoText Entry
To create an Outlook AutoText entry:
- The easiest way to start is to either open and reply to an earlier message you sent or create a new message containing the text you want to reuse.
- Next, highlight the text you want to save as AutoText. All formatting, images, links, and content will be stored within the custom entry.
- Then move to the Insert tab. Towards the right-hand side is Quick Parts, found in the Text group. From here, you’ll see a list of any existing Quick Parts you may have.
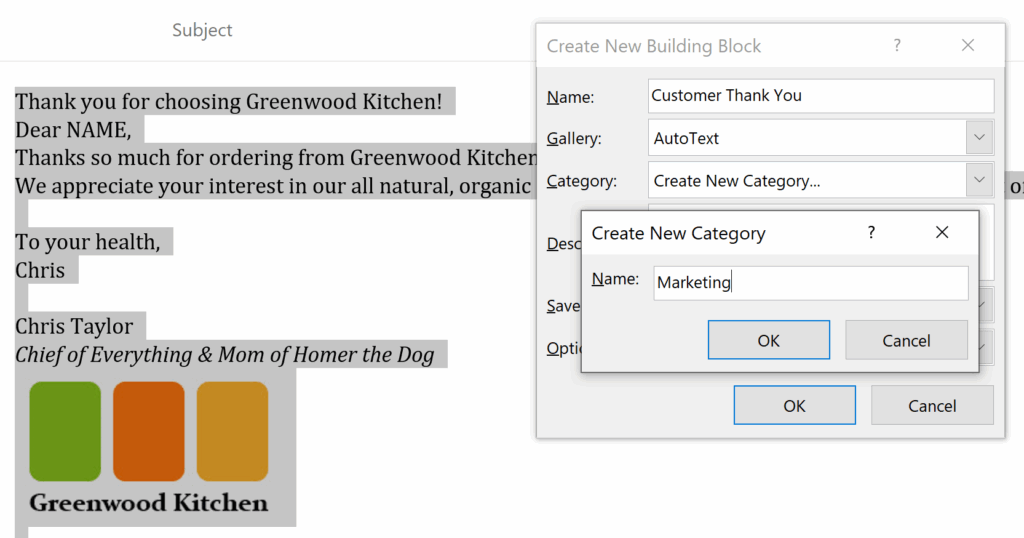
To create the entry, pick AutoText, then choose the option to Save Selection to AutoText Gallery. - From the Create New Building Block dialog box, enter a descriptive name for your entry, such as Marketing Follow-up or Supplier Resources.
- Next, choose where you want to store the entry; in this case, make sure the Gallery is set to AutoText. Then pick a category to help you organize your entries. The default choice is General, although you can also create additional categories such as Proposals, Meetings, or Contracts.
- Optionally, add a description that displays when you hover over existing AutoText choices. Categories are helpful if you create many AutoText entries.
- By default, your entry will be saved in the template, NormalEmail.dotm.
- Finally, there are options for how AutoText will be inserted. Keep the default, Insert content only. Finish with OK and close your sample email message without saving.
Note: Although AutoText entries can include formatting, graphics, and even links, these types of entries can’t include attachments.
Organizing AutoText with Categories
If you create a lot of entries, categories help keep them organized. For example:
- Marketing
- Sales
- Customer Support
- HR
- Legal
You can add categories when you create an entry, or add them later when editing. This makes AutoText much easier to manage as your library grows.
Four Ways to Insert AutoText into an Email
Method #1-From the Ribbon:

- To add an AutoText entry to a message, either create a brand new message or reply to an existing message.
- Next, select Insert > Quick Parts > AutoText to display your entries organized by category. For each entry, you will see a preview of the content. When you hover over a specific entry, you may also see the optional description.
- From here, select the AutoText entry you want to insert into your message. The big advantage here is that not only can each entry include formatting, links, and graphics, but you can also use multiple entries within one email message.
- For more flexibility in how you add AutoText, right-click the entry to display a shortcut menu with options for where you want to insert the AutoText entry, such as the beginning or end of a document.
Method #2-With AutoComplete:
- Create a new message or reply to a message.
- Type the name or first few characters of the AutoText entry, such as Customer, in the above example.
The key is to type a unique entry, so it helps to avoid starting with the exact words or characters for multiple entries, for instance, Contoso Marketing Widget and Contoso Marketing Gadget. Better choices would be Widget and Gadget, created in a Marketing category - You will see the first characters of the suggested entry. To insert the AutoText entry into your email, either press [Enter]. These keyboard options will insert the AutoText as long as you have typed enough of the name to create a unique entry.
Method #3-Using a Keyboard Shortcut:
If AutoComplete doesn’t display the entry, type the entire entry name and press [F3]. This instantly inserts your saved text.
Method #4-From the Quick Access Toolbar (QAT):
If you use AutoText frequently, you can add it to your QAT:
- Right-click the QAT and choose Customize Quick Access Toolbar.
- From All Commands, find and select AutoText.
- Click Add, then OK.
Now AutoText is one click away.
Editing or Deleting AutoText Entries
If you want to update or remove an entry:
- Go to Insert > Quick Parts > AutoText.
- Hover over any entry and right-click. Don’t worry. It doesn’t matter which entry you select. This is simply the technique to display the dialog box for making changes.
- Choose Organize and Delete.
- From there, you can:
- Edit properties (including category)
- Redefine an entry
- Delete entries you no longer need
This tool makes it easy to keep your AutoText library clean and up to date.
AutoText vs. Email Signatures
Many people use email signatures to store reusable content, such as mini-templates or disclaimers, but signatures have a significant limitation:
You can only insert one signature per message.
AutoText, on the other hand, lets you insert as many entries as you want, in any order. It’s far more flexible for people who rely on repeated email patterns.
Final Thoughts
Once you start working with AutoText, you’ll probably wonder how you ever managed without it. Even with just a few entries, you’ll quickly see how much faster and easier your email communication becomes. Whether you’re responding to clients, preparing project updates, or managing logistics, AutoText gives you a reliable, consistent, and efficient way to save time every single day.
For more Outlook tips, visit TheSoftwarePro.com/Outlook and sign up for my free monthly newsletter filled with time-saving Microsoft 365 tips.
© Dawn Bjork, MCT, MOSE, CSP®, The Software Pro®
Microsoft Certified Trainer, Productivity Speaker, Certified Speaking Professional