Microsoft PowerPoint includes an easy-to-use background removal tool. In PowerPoint, you might want to remove the background from an image to:
- Focus on the subject or remove distracting details.
- Layer pictures on another background or image.
- Gain more space on your slides.
- Customize an image for a creative look.
- Use your own photos that don’t have a transparent background.
In this post, we cover the steps to work with the background removal tool in PowerPoint. Or, watch this video to see how quickly remove the background from an image:
How to Remove the Background from an Image
Here are the steps to remove an image background:
- First, select the picture you’d like to work with by clicking on it. This image might be one of your photographs, a picture from a licensed stock image library, or an image from the free Microsoft Stock Images. Check out our blog to learn more about free stock images in Microsoft 365.
- When an image is selected, the Picture Format Ribbon becomes available.
- Pick Picture Format
- In the Adjust group, select the Remove Background option.
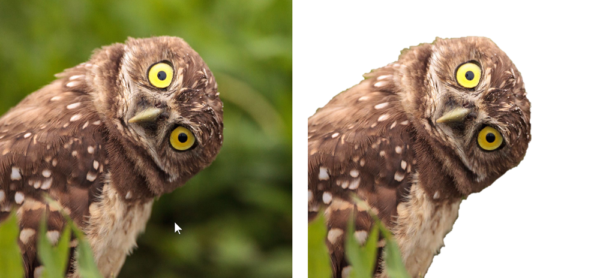
- PowerPoint uses artificial intelligence to detect the background.
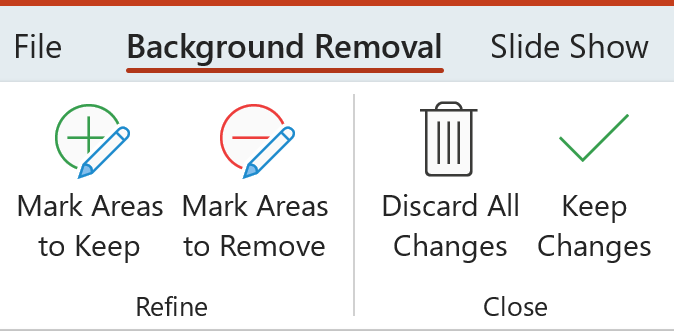
The default background area will be colored magenta to mark it for removal, while the foreground will retain its natural coloring. - If the default area isn’t correct, go to the Refine group in the Background Removal tool. The background removal options let you mark specific areas of an image to keep or remove.
- If parts of the picture you want to keep are magenta (marked for removal), select Mark Areas to Keep and use the free-form drawing pencil to mark the areas on the picture (shown in green) you want to keep.
- To remove more parts of the picture, select Mark Areas to Remove and use the drawing pencil (shown in red) to mark those areas.
- You only need to select a range, as this AI tool will pick nearby areas similar to the selection you want to keep or remove.
- When you’re done, select Keep Changes or Discard All Changes.
After removing the background, you can add an artistic effect or picture effects. Or, add another image or colored background.
Working with Microsoft Word, Outlook, and Excel
It’s good to know that this time-saving and remarkable technique to remove the background of an image also works in other Microsoft applications, including Word, Outlook, and Excel.
When Will Background Removal Not Work?
The PowerPoint background removal tool might not work very well when the object or person is too similar in color to the background, or there are a lot of shadows. You might also run into challenges if the background has a gradient or if there are tiny details like hair or feathers.
For vector graphic files—such as Scalable Vector Graphics (SVG), Adobe Illustrator Graphics (AI), Windows Metafile Format (WMF), and Vector Drawing File (DRW)—background removal isn’t possible, so in those cases, the Remove Background option is grayed out.
Bonus Tip: If you get stuck and the remove background tool doesn’t work in PowerPoint, try the free image removal tool at remove.bg. This clever AI tool is a great alternative.
Have fun and be creative with this helpful option in PowerPoint!
Was this PowerPoint tip helpful? Discover more PowerPoint techniques and shortcuts TheSoftwarePro.com/PowerPoint.
© Dawn Bjork, MCT, MOSE, CSP®, The Software Pro®
Microsoft Certified Trainer, Productivity Speaker, Certified Speaking Professional