When working with a shared Microsoft OneNote notebook, you can restrict access to specific sections by adding a password. For example, you might want to limit who can view budget or financial information in a OneNote section while keeping the other sections available to the team members who have access to the content in the shared notebook.
Follow these steps to apply a password to a OneNote section (or watch the video below):
To set a password for a specific section in a notebook:
 Right-click the section tab and select Password Protect This Section.
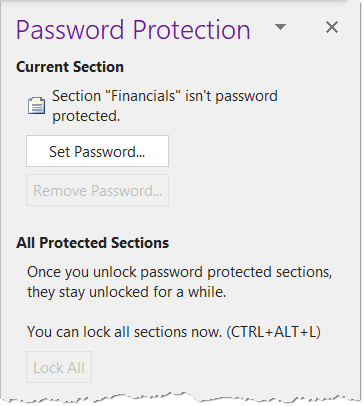
- The Password Protection pane will open on the right side of the screen.
- Click the Set Password button.
- Enter a password and confirm it.
- Click OK.
- You may be prompted about existing section backups. It’s up to you to decide and review whether or not you want to delete any previous backups of the OneNote section because those are not password-protected.
 Right-click the section tab and select Password Protect This Section.
Note: Keep in mind that passwords are case-sensitive, and it’s helpful to use the same password throughout if you are protecting multiple sections. And definitely don’t use a password you might have for other computer operations. Plus, your IT group or help desk will not be able to unlock a section if you forget the password. However, this can still be a valuable feature.
To Lock Password-Protected OneNote Sections
 Once you apply a password, you might notice that the section still remains available for a while even when you apply a password. However, you can lock all password-protected OneNote sections at any time by pressing [Ctrl] + [Alt] + L.
To unlock a protected section, simply click into the section or press [Enter] to unlock and then type the appropriate password.
Change Password Options
Once you work with password protection in OneNote, you may want to customize the behavior of the password options.
To change password options:
- Move to File > Options.
- Next, select the Advanced tab and navigate further down to the section on Passwords.
- So here, you can decide what happens when you’re no longer working on that section. How much time do you want to have pass before it becomes password-protected? Again, maybe as soon as you navigate away from them, or you can change to a different time increment.
Once you’ve worked with the password in OneNote, explore these options to determine if you want to further customize how this behaves.
Remove Password Protection from a OneNote Section
And, if you no longer need to restrict access to a password-protected section, it only takes a few steps to remove a password from a OneNote section.
To remove password protection:
- Right-click the OneNote section tab and select Password Protect This Section.
- In the Password Protection pane on the right side, click Remove Password.
- Next, enter the current password, then click OK.
Working with passwords can make it easier to share key OneNote notebooks while protecting access to sensitive information.
For more ways to be productive with Microsoft OneNote, find additional shortcuts, tips and tricks at TheSoftwarePro.com/OneNote.
© Dawn Bjork, MCT, MOSE, CSP®, The Software Pro®
Microsoft Certified Trainer, Productivity Speaker, Certified Speaking Professional