How can you customize your PowerPoint workspace to make it easier to create and edit presentations? In this article and the video below, we’ll look at how to simplify the layout and alignment of objects in your presentations by working with the PowerPoint slide layout tools, including rulers, drawing guides, and gridlines.
Setting up the Ruler, Gridlines & Guides
When you are preparing a presentation, make sure to turn on PowerPoint’s helpful visual on-screen references, including:
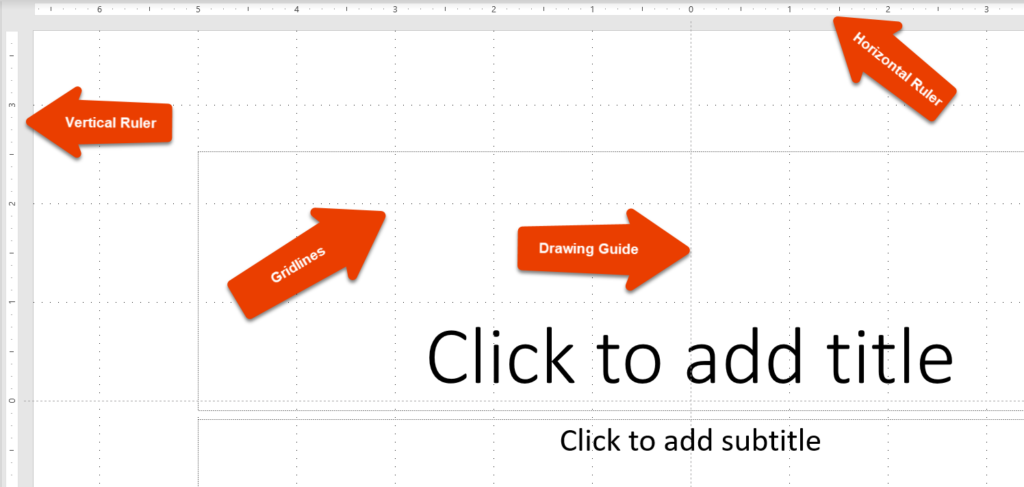
- The horizontal and vertical rulers
- Layout gridlines
- Drawing guides
Each of these options will help you more easily align objects in a slide. When turned on, guides, gridlines, and rulers display on every slide and in other slide show presentations.
Helpful Tip: It’s also good to know that none of these PowerPoint slide layout tools will show up when your presentation is printed or displayed as a slide show.
To turn on the ruler, gridlines, or guides:
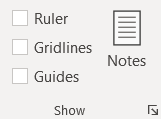
- Pick the View tab and then move to the Show group, where you’ll see checkboxes for Ruler, Gridlines, and Guides.
Although you could turn all of them on at the same time, it will be easier to see how each one of these may be helpful to you. And so, you may want to start working first with one or two options, such as the Ruler and Gridlines.
Ruler
To turn the rulers on or off:
- Pick the View tab and then move to the Show group, where you’ll see checkboxes for Ruler, Gridlines, and Guides. Select Ruler, or
- Press the Ruler shortcut: [Shift] + [Alt] + [F9]
Rulers display at the top and left of your Normal view of the slide. The center of the horizontal and vertical rulers are set at 0 (zero). The measurements on the rulers correspond with the dimensions set for the on-screen slide, which is a widescreen format by default. As you move your mouse on the slide, you will see a dynamic marker or reference in the rulers, which can be helpful when moving objects.
Gridlines
When you enable gridlines in PowerPoint, a grid appears on your slide, like graph paper, with primary horizontal and vertical lines every inch, and markers (dots) every 1/12 of an inch (if using inches as your unit of measure).
To turn gridlines on or off:
- Pick the View tab and choose the Gridlines checkbox in the Show group, or
- Press the Gridlines keyboard shortcut: [Shift] + [F9].
You may have already used the grid without even realizing it because a feature called Snap objects to grid is turned on even if the grid is not displayed. The snap feature means that when you move objects or placeholders of any kind, they may seem to “jump” as you move them. It is a lot easier to understand and work with the snap to grid option when the grid is displayed.
For more specific placement of objects in a PowerPoint slide, you might find it helpful to have a smaller spacing on the grid.
To change the grid spacing:
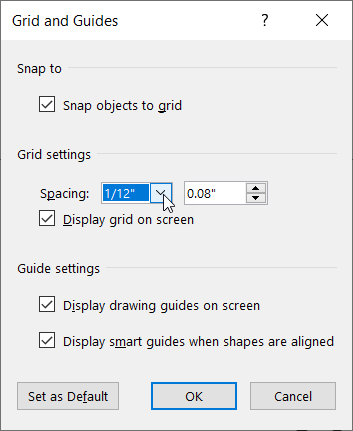
- From the View tab, click the dialog launcher for the Show group (the arrow in the bottom-right corner of the group). The Grid and Guides dialog box appears.
- Optionally, turn off the Snap objects to grid feature.
- Change the Spacing setting for a different grid, for example, to 1/16” spacing (if your unit of measure is inches), or pick a choice that fits your layout preferences. Check the option Display grid on screen if the grid isn’t already displayed.
This dialog box is also one way to turn on drawing guides in PowerPoint.
Drawing Guides
With many presentations, it is also useful to enable on-screen guidelines. When the guides are turned on, vertical and horizontal lines display at the center points of the ruler. This is another reason why it’s helpful to turn on the ruler to use it alongside your guides, and potentially the grid as well.
To turn guides on or off:
- Pick the View tab and choose the Guides checkbox in the Show group, or
- Press the Drawing Guides keyboard shortcut: [Alt] + [F9], or
- Check the Display drawing guides on screen from the Grid and Guides dialog box (see above)
To move or copy guides:
- Move: To move a guide, hover your mouse over the guide and press and hold your mouse as you drag the guide to a new location.
- Copy: For more complicated layouts, you can create additional guidelines to give you more reference points in your slides. To copy a guideline, instead of moving it, press and hold [Ctrl] as you drag the guideline to another location.
How will you use these time-saving and handy PowerPoint slide layout options to create and edit your slides?
Were these PowerPoint tips helpful? Discover more PowerPoint techniques and shortcuts TheSoftwarePro.com/PowerPoint.
© Dawn Bjork, MCT, MOSE, CSP®, The Software Pro®
Microsoft Certified Trainer, Productivity Speaker, Certified Speaking Professional