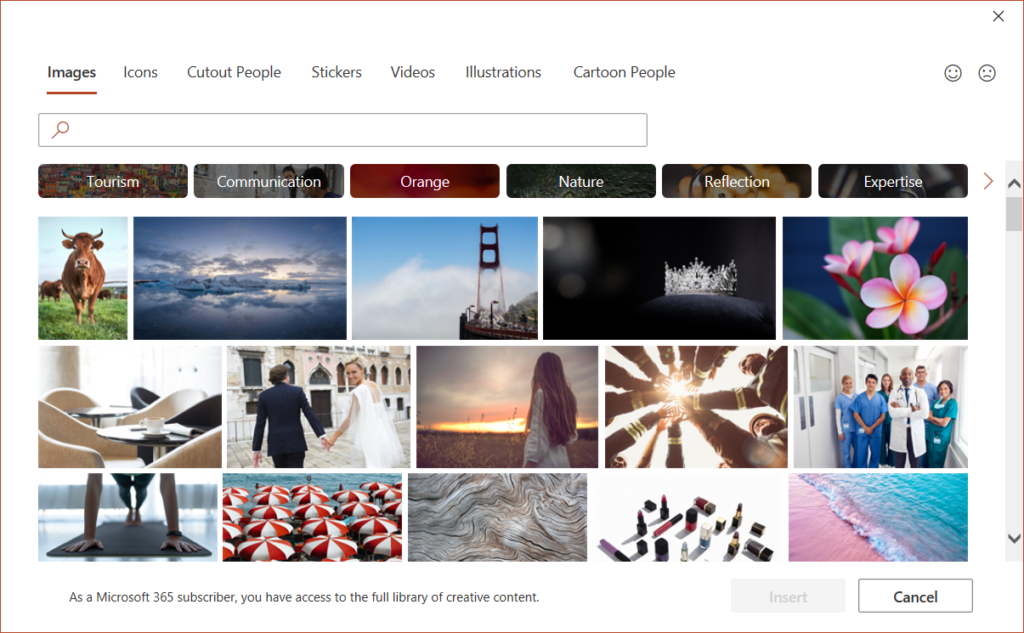
Microsoft 365 subscribers now have access to a growing library of thousands of royalty-free images, icons, illustrations, videos, and more to use in their documents, presentations, workbooks, and emails. These Microsoft Stock Images are available in Office applications, including PowerPoint, Word, Excel, and Outlook.
Let’s look at how you can enhance your work using stock images. Or watch my video on the how-to steps to use the Microsoft Stock Images.
Adding Images
To add a graphic from the Stock Images:
- Move to the location in your document, presentation, email, or worksheet where you want to add an image.
- Next, pick the Insert tab, select Pictures, and then Stock Images. The term, stock images, can be a bit deceiving because these include so much more.
- Your choices are organized into major groups: Images, Icons, Cutout People, Stickers, Videos (PowerPoint only), Illustrations, and Cartoon People.
- At the top of each group, you can choose from more focused categories such as Nature and Technology. Or use the search box at the top of any collection to find relevant images.
- Explore your options and pick the type of graphic you want to add to your work. You can select more than 1 item. Then select Insert.
- Size, move, and modify the graphics as you wish.
These images are a fantastic addition to your Microsoft 365 because they are:
- Free to use (see limitations at the end of this article).
- Not violating image copyright. It’s good to keep in mind that just because you found an image online doesn’t mean you have the license or right to legally use the image (read this post to find other options for free and paid images and learn more about copyright issues).
Microsoft Stock Images Choices

- Images: Thousands of photos and graphics of a diverse range of topics and subjects. Once an image is added, it can be edited using the graphics tools in each Office application.
- Cutout People: Here, you’ll find a wide range of images of people organized by name, so you can easily add various pictures of a person. Or search for a specific emotion or term to find the best match. In addition, these images have a transparent background, giving you more versatility when you add an image to a colored background, such as a PowerPoint slide.
- Illustrations & Icons: These images also have a transparent background and can be easily sized. The color accents of a selected illustration or icon can also be changed from the Graphics Fill option in the content-sensitive Graphics Format Ribbon tab (see video for more details).
- Stickers & Cartoon People: Although these images may not fit most business applications, they offer a wide range of more casual choices for education and personal use.
- Videos: (PowerPoint only) Explore how you might add these royalty-free videos to a PowerPoint presentation.
Where Can You Use These Images?
Now that you have an overview of the versatile Microsoft Stock Images, it’s good to know how you can use these images. First, review the terms and conditions for your Microsoft 365 subscription. And keep in mind that the terms of using these stock images may change, so this is not legal advice.
OK to Use Microsoft Stock Images
- According to Microsoft, you can include these stock images in presentations, workbooks, documents, email, SharePoint Team sites, or other Office or Microsoft 365 files you share or sell.
- You can also export these Office files to other formats, such as PDF.
Not OK to Use Microsoft Stock Images
- However, you can’t copy and paste this creative content into 3rd party applications for use in other contexts (such as on websites or merchandise).
- And you’re not allowed to use Save As to save this content as separate image files to be used outside of Microsoft 365.
Still, the availability of these royalty-free stock images is a huge enhancement for your documents, presentations, workbooks, and email. And the great news is that Microsoft will continue to update these stock image choices, so expect to have an expanded library in the future.
How will you use Microsoft Stock Images in your next Office project?
Discover more Microsoft Office tips and tricks at TheSoftwarePro.com/Office.
© Dawn Bjork, MCT, MOSM, CSP®, The Software Pro®
Microsoft Certified Trainer, Productivity Speaker, Certified Speaking Professional
