How can you leverage the Outlook FindTime add-in? Think about the last time you tried to find a time for a meeting. If everyone involved in the meeting is part of the same organization, you can use Outlook’s Scheduling Assistant to show you the availability of each person you want to invite to the meeting. However, it becomes more complicated when you are trying to set up a meeting with a lot of people, with people who have busy calendars or others who work outside of your organization, and you can’t even see their calendars.
This process of finding a suitable time for a meeting can be time-consuming and complicated. Too often, this means there are long email threads going back and forth. People will throw in different times that work for them. And then you spend a lot of time looking for a time that fits everyone. Or, you could use a third-party application like Doodle, but that doesn’t integrate well with your Outlook calendar.
The time-saving answer might be FindTime, a free Outlook add-in. The how-to steps for the Outlook FindTime add-in are provided below and in this video:
Getting Started with the FindTime Add-In
The Outlook FindTime add-in is designed to solve the scheduling challenge of wasting too much time trying to find the right time for a meeting. Here’s how FindTime works if you’re a meeting organizer:
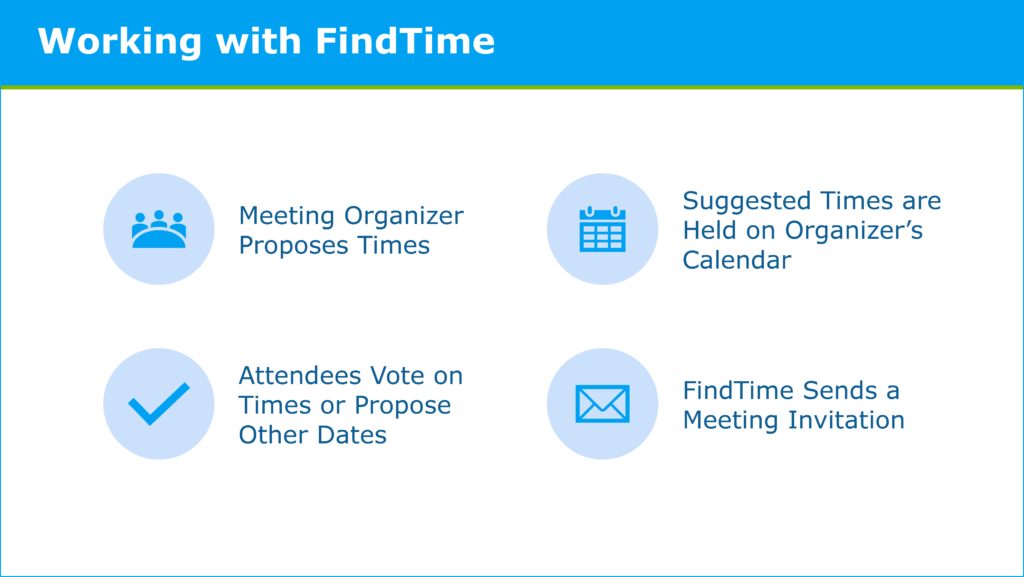
- If you’re the meeting organizer with FindTime, you propose a few initial times.
- The suggested times are temporarily held on your calendar.
- Invited participants now vote on the times that work for them. And, if none of the proposed times work, the attendees can suggest additional times to vote on for the meeting. Your meeting attendees do not have to be using Outlook or have FindTime installed.
- Once a time is found that works for everyone, FindTime schedules the meeting in your calendar, saving you lots of time. The other held dates are removed from your calendar. Depending on your configuration, you may need to create and send a meeting invitation.
How to Install FindTime
 First, how do you get started with the FindTime add-in? FindTime is supported by education and business Microsoft 365 accounts. If you have a free or paid consumer account, you won’t be able to use FindTime. As long as your organization supports add-ins, there are two ways to install the FindTime add-in:
- FindTime.Microsoft.com
- From Outlook: Home > Store > Add-ins. Search for FindTime and add.
Scheduling a Meeting with Outlook FindTime
To schedule a meeting in Outlook with FindTime:
- Create a new email or select an email you want to reply to with FindTime. In either case, the end result is the same.
- Add the people required for the meeting in To and optional participants in Cc.
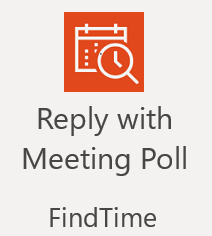
- With a new email message, select the New Meeting Poll option in the Message tab of the Ribbon. If you are replying to an email, choose the Reply with Meeting Poll option in the Message tab of the Ribbon.
- Online meetings are enabled by default. When Online Meeting is selected, FindTime will schedule a Microsoft Teams meeting if this is set up by your organization as the default online meeting channel. If you’re using a third-party online meeting provider such as Zoom or Webex, you can still schedule a meeting through FindTime, but you cannot use the auto-schedule option.
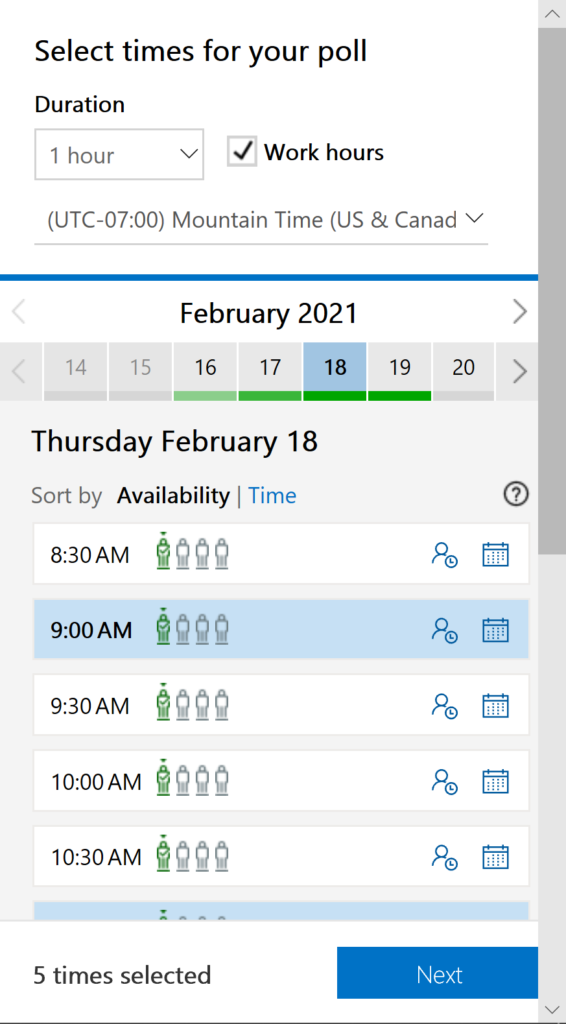
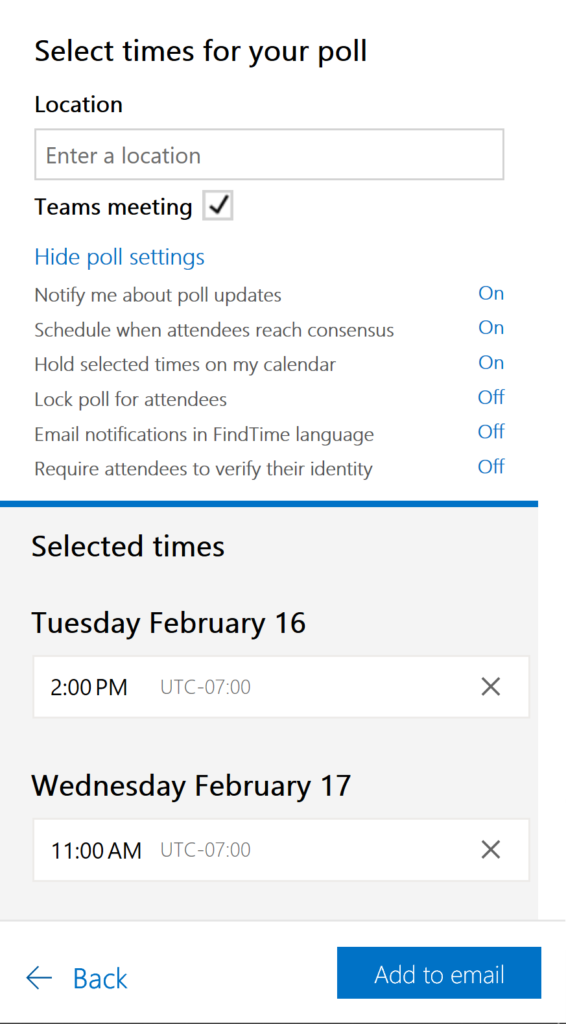
- Select the meeting options you want to send in your email poll. You can choose up to 20 times.
- Select the meeting settings (listed below) and then choose Next.
- Select Poll settings and toggle the On/Off options. Options include getting a notification each time an attendee votes, scheduling when attendees reach consensus, and holding selected times on your calendar.
- Choose the Add to email option. FindTime adds the suggested meeting times to your email. Select Send to send the meeting invites and start the voting process.
FindTime Meeting Options
- Duration: Select a duration from the list, such as 60 minutes. Select Custom in the time dropdown menu to set your own time. The maximum duration is 23 hours 59 minutes.
- Work Hours: Check this option to limit suggested meeting times to work days and hours only. Note: The working hours used by default are retrieved from your calendar settings. You’ll find these under File > Options > Calendar. Work hours default to 8 a.m. to 5 p.m. if no settings are found.
- Time zone: Select the time zone dropdown menu to change the time zone for the meeting.
- FindTime looks through the attendees’ schedules (if internal) and suggests suitable meeting times along with your availability.
Use the links to sort the meeting options:
- Availability: Lists the best options (times when all required meeting participants are free) first. Factors used to determine the best options include how many attendees are free, how many required vs. optional attendees are free, and whether conflicted attendees have tentative or busy commitments on their calendar. Note: you will only see availability for other people in your organization. You won’t have access to the availability of outside meeting attendees.
- Time: Lists the options chronologically.
- You can scroll through the days and months using the arrows. Available days are underlined in green. Darker green indicates days with the most options, and a lighter green and red indicate the most conflicts. Weekend days are marked available if Work Hours is not selected.
- The people icons show whether meeting participants are required and their availability. You can use the icons to access more information. Hover over each person’s icon to view their availability information.
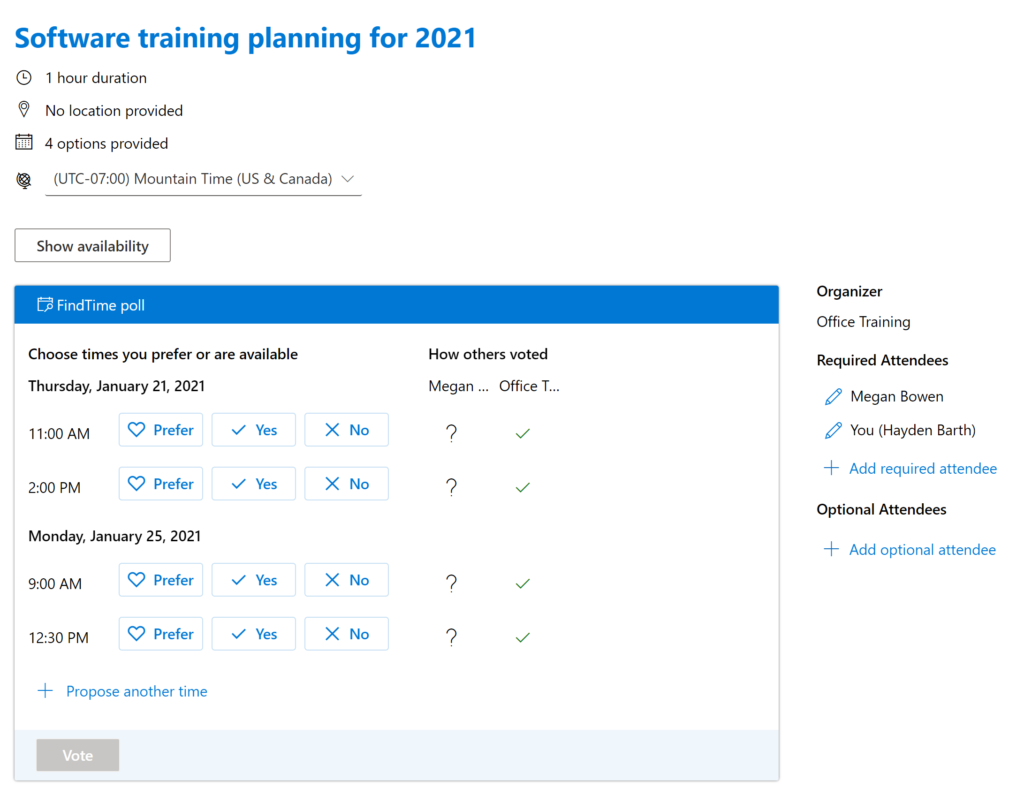
Voting in FindTime
When they receive your invitation, the meeting attendees select the link to view their meeting options and can vote on the times they prefer or are available. Choices are Prefer, Yes, and No. If they work with Outlook, they will also see if they are free or busy for each proposed time. Once all votes are received, the first available time will be scheduled or held for the meeting. However, the Prefer option takes precedence over Yes votes when a final consensus is reached by the attendees. In addition, attendees can propose another time to meet.
At any time, the meeting organizer can select a date even if all attendees haven’t voted. Depending on current meeting settings, the meeting may be automatically scheduled as a Microsoft Teams meeting. If not, the organizer will still need to manually schedule the meeting with the preferred virtual platform or available physical space. And once a date is selected, all other held dates are removed from the organizer’s calendar.
How will you leverage the Microsoft Outlook FindTime add-in to save time scheduling your meetings?
For more time-saving Microsoft Outlook techniques, find additional shortcuts, tips, and tricks at TheSoftwarePro.com/Outlook.
© Dawn Bjork, MCT, MOSE, CSP®, The Software Pro®
Microsoft Certified Trainer, Productivity Speaker, Certified Speaking Professional