When you have data in Excel you want to use differently; that is, to combine multiple columns or extract just portions of the data, Flash Fill might be the solution. Although there are a number of functions that can get you the same results, such as CONCAT to combine or the LEFT, MID, and RIGHT functions to extract portions of the data, Excel Flash Fill may be an easier answer.
To learn more about Flash Fill, continue reading or watch the video below.
How Does Flash Fill Work?
With Flash Fill, Excel is looking for a pattern, so your data needs to be consistent. If you’re not getting the results you’re looking for, you might need to do some data normalization or clean up the data to remove inconsistencies, such as removing a middle initial used in a name or eliminating a prefix or suffix.
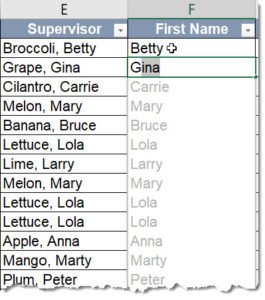
Flash Fill is easier than you might think. Let’s say you have a column of names that is formatted with the last name, a comma and space, and the first name. To get a column of only the first name, create a new column adjacent to the full name column. Next, type the first name found in the full name and hit [Enter]. Next, start typing the first name for the next entry or two, and Excel will automatically vertically populate the remaining names based on the pattern in the first few examples. If you’re seeing the answers you want, just press [Enter] to accept the results. No other actions are needed, although it’s helpful to double-check your results. Flash Fill not only works with text entries but also with dates and numbers.
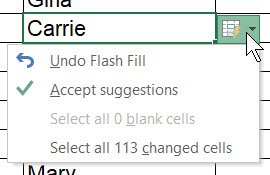
With Flash Fill, the data you see isn’t going to change because there isn’t a formula or a link pointing back to the original data; it is actual data you can sort, filter, and edit. In fact, once you have the results you want, you could delete the original data. When you use the Excel Flash Fill option, one of the features that also displays is the Flash Fill smart tag. If you’re happy with the results, you can ignore this smart tag, but this option is available to reverse the feature or even highlight the cells in case you wanted to copy this data to another location. Or, if you don’t want to Flash Fill the data, choose the Undo Flash Fill option under the smart tag or press [Esc].
Other Ways to Launch Excel Flash Fill
It isn’t necessary to do anything to make Flash Fill work because the feature is enabled in Excel by default. If, for some reason, it is turned off, you can turn it on by going to the File tab. Next, choose Options at the bottom and then pick Advanced. You’ll find the feature under the Editing options section: Automatically Flash Fill.
Flash Fill can be triggered automatically in other ways, including options in the Ribbon and even with a keyboard shortcut. And I happen to love keyboard shortcuts. The shortcut for Flash Fill is [Ctrl] + E. Let’s see how this works:
- Enter the pattern you want to extract, such as a last name from the full name. The most common approach is to type a handful of examples in a column until Excel detects a pattern and triggers Flash Fill. Typically, we’d type a sample entry to demonstrate the pattern, press [Enter], continue with the next entry, and then either come back to the entries to launch the feature or look for it to be automatically triggered.
- As an alternative, instead of hitting [Enter], press [Ctrl] + [Enter], which completes the entry but keeps you positioned in the same cell. Next, press [Ctrl] + E, the shortcut for Flash Fill. And if Excel is able to find the pattern, you have now filled entries to match that data.
You can also find the Excel Flash Fill feature in the Ribbon:
- Home tab > Editing group > Fill > Flash Fill, or
- Data tab > Data Tools group > Flash Fill
With Flash Fill, you now have the power to quickly convert or extract your Excel data in a way that works for you.
To extend your learning on Microsoft Excel, check out these additional shortcuts, tips, and techniques at TheSoftwarePro.com/Excel.
© Dawn Bjork, MCT, MOSE, CSP®, The Software Pro®
Microsoft Certified Trainer, Productivity Speaker, Certified Speaking Professional