Working with screen clipping tools is a useful way to capture images, reference articles, portions of a PDF file, website contents, or relevant parts of the text that you want to grab quickly. Try these easy ways to capture content with OneNote screen clipping tools:
- OneNote Screen Clipping
- Windows Snip & Sketch
- OneNote Web Clipper
Learn more about these options below, or watch my video to see how to easily insert screen clippings into Microsoft OneNote:
OneNote Screen Clipping
The easiest way to grab a screen capture from Microsoft OneNote is to use the built-in Screen Clipping tool.
To insert a screen clipping directly on a page:
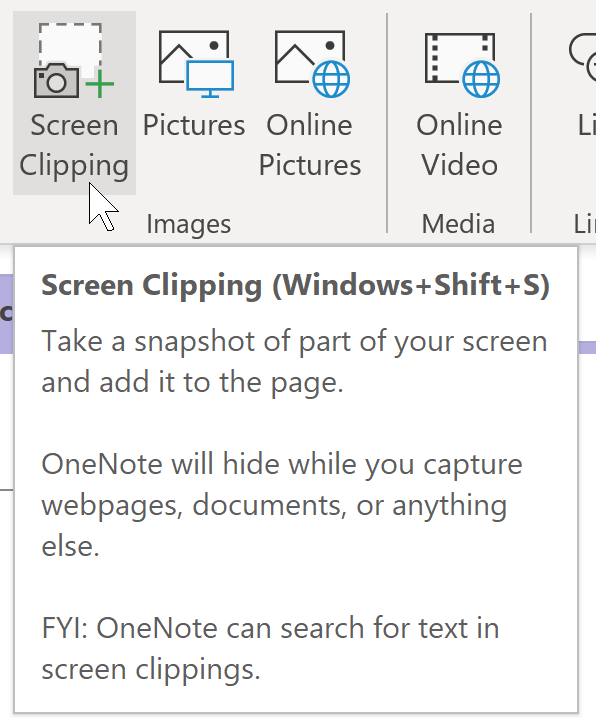
- Move to the OneNote page where you want to add a screen clipping.
- Next, open the program or browser window you want to capture before actually activating the Screen Clipping tool.
- Choose the Insert tab and select Screen Clipping.
-OR-
Press Windows + [Shift] + S. - Your mouse changes from a pointer to a crosshair. Next, drag across the area of the screen you want to capture.
- OneNote inserts the clipping onto the page. Next, you can resize or move the picture as needed.
Keep in mind that as soon as you activate the tool, the OneNote window is minimized, and the capture mode is enabled. For that reason, you may need to do a little setup work first before taking a snapshot.
Windows Snip & Sketch
The Windows Snip & Sketch is the upgraded replacement for the Snipping Tool, which is also available. Snip & Sketch can work directly with OneNote or independently to add screen captures into other applications.
To create a screen clip to add to OneNote when OneNote is not open:
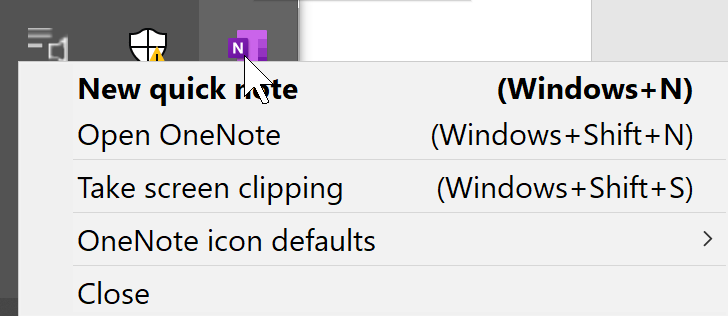
- Right-click the OneNote icon in the Windows Notification area (on the right side of the taskbar), and choose Take screen clipping or press Windows + [Shift] + S.
- Drag to select the area you would like to save.
- Next, a dialog box displays to indicate the OneNote notebook, section, and page where you want to add the screen clipping.
To create a screen clipping at any time from Windows:
- Press Windows + [Shift] + S.
- Drag to select the area you would like to save.
- The screen clipping is now in the Windows Clipboard.
- Move to the file where you want to add the screen capture (this doesn’t have to be a OneNote page) and use your favorite Paste command (mine is [Ctrl] + V) to insert the screen clipping.
OneNote Web Clipper
The OneNote Web Clipper app installs in your browser to save, annotate, and organize web content. You can install it from OneNote.com/Clipper. This free add-in is available for the Chrome browser. However, if you access this link from the Microsoft Edge browser, you can now install a Chrome add-in within Edge.
Once you install the OneNote Web Clipper browser extension, the icon (OneNote icon) will appear to the right of the URL bar. Note: You may need to click on the Extensions option to pin the extension to the address bar.
To capture a screen clipping with the OneNote Web Clipper:

- From a browser window with content you want to capture, click the Clip to OneNote icon.
- If needed, log in to your Microsoft account.
- Next, select the OneNote notebook where you want to add the screen clipping and choose from the capture options: Full Page, Region, Article, or Bookmark.
- Finally, pick Clip to insert the OneNote screen clipping into the notebook.
Other Screen Capture Options
Although these options do not let you control the area of the screen you want to clip or capture, there are two other free ways to take a screen capture in Microsoft Windows using the Print Screen key (the label varies by keyboard). The built-in screen capture options are:
- [PrtScn]: Copies the entire screen into your Windows Clipboard.
- [Alt] + [Prtscn]: Captures the current window or dialog box.
Once the screen capture is in the Clipboard, use your favorite Paste command to add the captured images to OneNote or other documents.
Additionally, you might consider a paid screen capture program such as TechSmith’s SnagIt, which offers a wide range of options for formatting, editing, and saving your screen captures.
Which of these tools will you use to grab screen clippings to add to your Microsoft OneNote notebooks?
Find other time-saving Microsoft OneNote shortcuts, tips, and tricks at TheSoftwarePro.com/OneNote.
© Dawn Bjork, MCT, MOSE, CSP®, The Software Pro®
Microsoft Certified Trainer, Productivity Speaker, Certified Speaking Professional