
Are scattered notes and endless emails slowing your team down? You’re not alone. According to McKinsey, teams can waste up to 20% of their workweek simply searching for information. The solution? Microsoft OneNote.
In this guide, you’ll learn step-by-step how to easily share a OneNote notebook—streamlining communication, collaboration, and productivity across your team. Or, watch my video below to get started immediately.
Benefits of Sharing OneNote Notebooks
Sharing OneNote notebooks improves team communication by:
- Supporting real-time collaboration with team members.
- Providing centralized information for teams and projects.
- Reducing emails and version confusion.
Let’s look next at how to move a notebook, share a OneNote notebook, and view changes to a shared notebook.
Step 1: Moving Your Notebook to the Cloud
The first step in sharing a notebook is to make sure it’s stored in an accessible location, such as OneDrive or SharePoint. If you have a OneNote notebook stored on your local computer, how do you make it available for sharing? Note: These steps apply to the OneNote desktop app.
How to move a OneNote notebook to OneDrive or SharePoint:
- With the local notebook open, pick File > Info.
- Here, you’ll see a list of available notebooks.
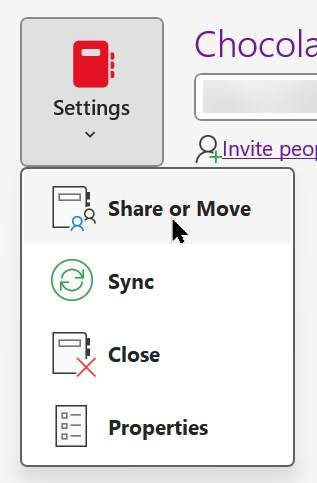
- For the notebook you want to upload to the cloud, pick Settings > Share or Move.
- Choose OneDrive or Sharepoint.
- Once the notebook is in the cloud, the next step is to share the notebook. See the details below.
Note: If a OneNote notebook needs to be moved to the cloud, launching the next steps to share a notebook will also prompt you to move the notebook.
Step 2: Sharing Your Notebook with Ease
For any notebook already in the cloud, the next step is to specify who can have access. There are multiple options to share:
- Choose the Share button in the upper-right corner of the OneNote window. Then select Share Entire Notebook.
-OR- - Pick File > Share.
The steps are the same for OneNote for the Web.
Share Your OneNote Notebook by Invitation
To share a OneNote notebook with an invitation:
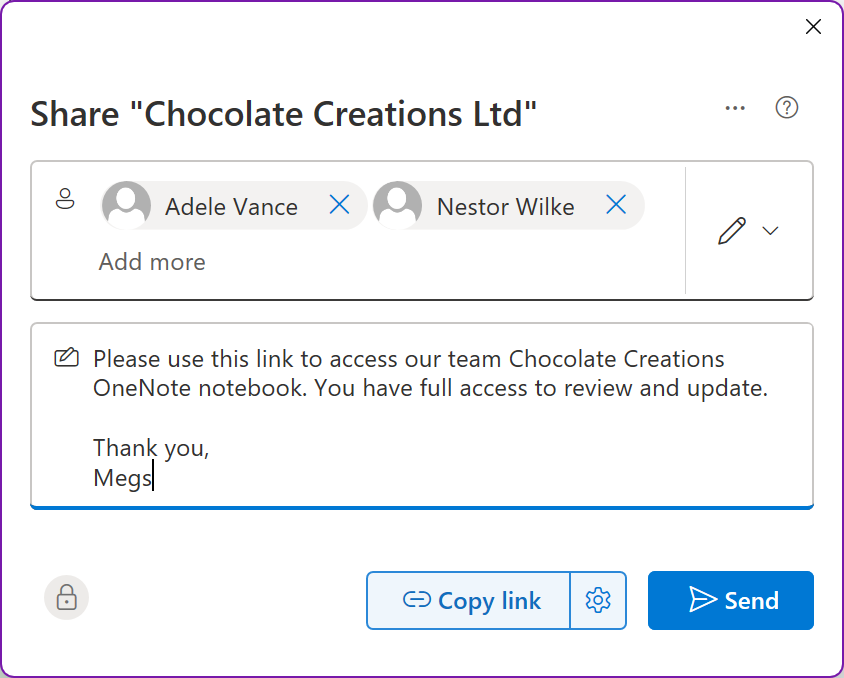
- Pick File > Share or click the Share button.
- Under Share with People, type the names or email addresses of people you’d like to give access to your notebook. A notebook can be shared internally and/or with external email addresses.
Your options may differ if you’re an individual versus a business user. - In the drop-down box to the right (the pencil icon), choose whether each person can edit or only view your notebook.
- Add a personal note if you’d like, and choose Send.
The designated recipients will receive an invitation to open the notebook. The message includes the link to work with the notebook.
Important: It’s good to know that although sharing a notebook gives them access to the entire notebook in OneDrive, it doesn’t give others access to other files or content in the same location.
Sharing with a Link
Another way to share a OneNote notebook is by creating a link that can be added to an email or team chat.
How to create a shareable OneNote link:
- Once again, choose File > Share or pick the Share option in the upper-right corner of the OneNote notebook window.
- You’ll see the same dialog box used to create an invitation.
- Click the Create a Link at the bottom.
- The options for sharing include:
• Anyone
• Only certain people
• Anyone in the organization - You can also specify if the recipient(s) can edit the notebook or only view the OneNote notebook.
- Optionally, you can set an expiration date for sharing the notebook. For instance, a notebook may only be needed for a specific project or proposal.
- Once you set up your sharing options, choose the option to copy the link.
- Finally, share the link by email or even in a Teams chat or channel.
Step 3: Protecting Your Data
One of the other concerns about sharing a OneNote notebook is about accidentally sharing sensitive information. If you have a section in the notebook you don’t want to share with others, you can move it to a different notebook or apply password protection to the individual section.
Check out this article and video to learn more about adding password protection to a OneNote section.
Step 4: Viewing Recent Edits in a Shared Notebook
Another hesitation about sharing a notebook is losing control over the content. Fortunately, OneNote makes reviewing recent edits to a notebook easy.
To review recent edits to a notebook:
- In the History tab of the OneNote Ribbon, select the Recent Edits drop-down from the Authors group.
- Select a time range to view, for example, Today or Last 30 Days.
- The search results will appear on the right side of the screen, with edited pages highlighted in yellow.
- To view notations on specific edits by author, choose the History tab and uncheck, if needed, the Hide Authors option.
- Using the links from the search results, click on the pages you want to review in more detail.
Sharing a OneNote notebook doesn’t just save time—it streamlines your entire team’s productivity. Start today and see the difference.
Are you ready to become more productive with Microsoft OneNote? Discover other OneNote resources at TheSoftwarePro.com/OneNote.
© Dawn Bjork, MCT, MOSE, CSP®, The Software Pro®
Microsoft Certified Trainer, Productivity Speaker, Certified Speaking Professional