To quickly access frequently used and favorite actions in Microsoft Word, consider adding these options to the Word Quick Access toolbar. If you’re not familiar with this handy toolbar, you’ll find it above the Microsoft Word Ribbon in the upper-left corner. By default, it only contains a few standard options, including Save, Undo, and Redo. Yet, it offers many other ways to save time working with your Word documents.
In this article, I’ll share 3 techniques to customize the Microsoft Word Quick Access Toolbar (QAT):
- Add and remove commands from the Quick Access Toolbar dropdown menu.
- Add commands from the Word Ribbon.
- Add, remove, and rearrange commands from Word Options.
Or watch this video for step-by-step instructions on customizing the Word toolbar.
Customize Technique #1: Dropdown Menu
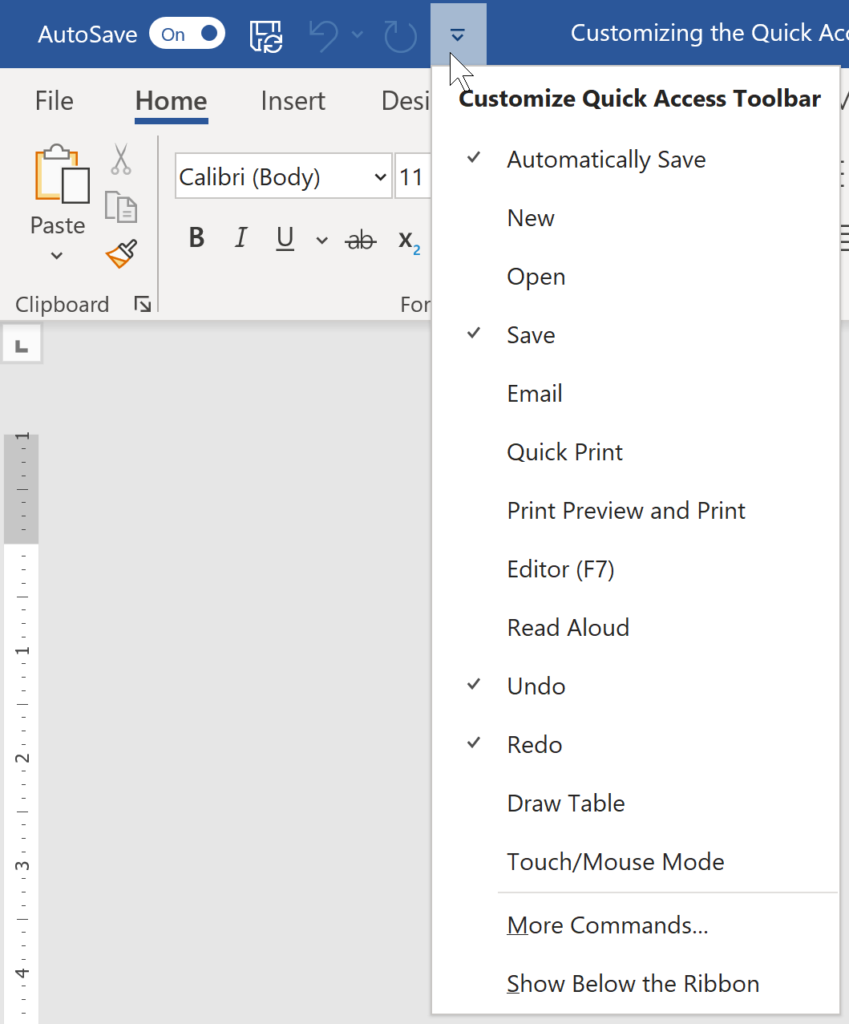
Click on the down arrow to the right of the toolbar.
- A short list of popular commands appears on the drop‑down list. These include file management options like New, Open, and Quick Print. Select a command to add. A checkmark appears in front of each command on the toolbar.
- Click the down arrow each time to quickly add or remove the command.
Try out these new commands and explore other customization options to build a Quick Access Toolbar that saves you time in Microsoft Word.
Note: Changes to your Quick Access Toolbar are not document-specific. They apply to the entire Microsoft Word customization, and you’ll see your custom Quick Access Toolbar each time you launch Word.
Customize Technique #2: Add from the Ribbon

- To add a tool you use on the Word Ribbon to the Quick Access toolbar, locate the command or action you want to add to the toolbar. For instance, formatting options like strikethrough, Show/Hide, and bullets. My QAT also includes multiple options from the View tab: One Page, Multiple Pages, and Page Width.
- Right‑click on the command and then left‑click on the menu option, Add to Quick Access Toolbar. To remove a command from the toolbar, right‑click on the icon in the toolbar and select the option, Remove from Quick Access Toolbar.
Tip: To change where the Quick Access toolbar displays, right‑click the toolbar or click the down arrow to the right and select Show Quick Access Toolbar Below the Ribbon or Show Quick Access Toolbar Above the Ribbon. Displaying your toolbar below the Ribbon makes the icons clear to see and gives you easier access to the tools.
Customize Technique #3: QAT Options
- Another way to add, remove, or move the Quick Access toolbar icons is to customize it more extensively. Just right-click on the Quick Access Toolbar and choose (left-click) the Customize Quick Access Toolbar option from the shortcut menu.
Pick this option when you want to change the location of your toolbar icons or add options that aren’t displayed on the Ribbon. - In the left-side column, pick from commands in grouping, such as Popular Commands (such as Save As), All Commands (including Close File, Close All), and commands specific to each tab.
- Highlight the command icon and then select the Add button. Your selections will display in the listing to the right, which shows you your current Word Quick Access Toolbar.
- To move a command, select it from the list on the right and then click the up or down buttons to re‑position. To remove a command from the Quick Access toolbar, select the command and choose the Remove button.
- Pick OK to apply your changes.
It’s entirely up to you what to add to the toolbar. How will you use the Quick Access Toolbar to make it easier to work with your documents in Microsoft Word?
Discover more time-saving Microsoft Word tips at TheSoftwarePro.com/Word.
© Dawn Bjork, MCT, MOSE, CSP®, The Software Pro®
Microsoft Certified Trainer, Productivity Speaker, Certified Speaking Professional