Are you tired of typing the same blocks of text repeatedly in Word? How can you easily add frequently used text or graphics to your Word documents?
In this post and the video, we’ll look at how to save time by creating repetitive entries in Microsoft Word using AutoText.
In Word, you can use the Quick Part Gallery to create, store, and reuse pieces of content, including AutoText, document properties (such as title and author), and fields. These reusable blocks of content are also called building blocks. Examples include your organization’s address or logo, standard contract paragraphs, and signature blocks for legal documents. In this training, our focus will be on AutoText, a common building block that stores text and graphics.
Creating Word AutoText Entries
To create a Word AutoText entry:
- Open a document that contains the text or graphics you want to use in other Word documents. For my example, I want to store the address and logo for a fictional city, Columbine Hills.
- Select the phrase, sentence, or other portion you want to store as reusable Quick Parts. Your entry can include formatting, text, and images.
- Go to the Insert tab, and in the Text group, choose Quick Parts.
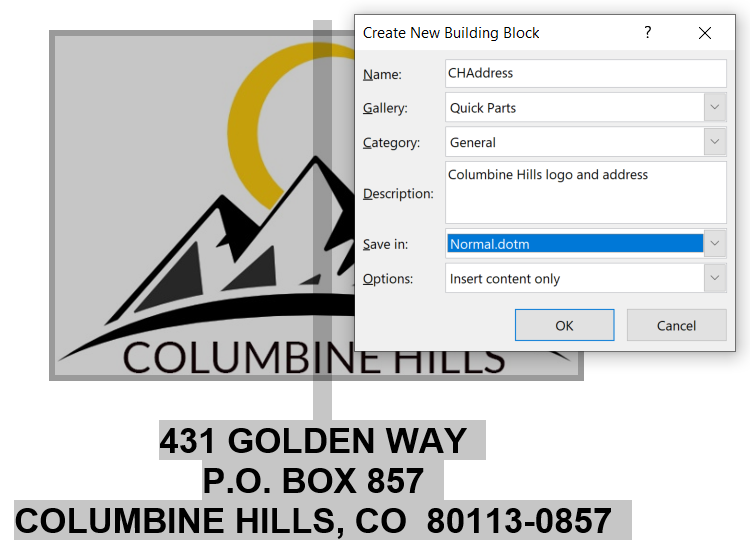
- Pick AutoText. Or, even easier, press [Alt] + F3. Because AutoText entries are building blocks, the Create New Building Block dialog box displays.
- Enter a unique name for the AutoText entry. This could be a common word or phrase or a custom label.
If you want to use the shortcuts to replay this entry, choose a short, one-word name. Although you can use even just one letter or a number for your entry name, a name with 4 or more characters will trigger the AutoComplete feature, which will enter an AutoText entry into your document just by typing a few characters. I’ll show you how to do this as we continue.
For AutoComplete to work best, make the beginning of your AutoText entry name different from other AutoText entries. If any of the names are similar, you’ll have to type more characters. - For my example, I used CHAddress for the Columbine Hills address. A shorter name, such as CHAdd, would also work. This will be added to the AutoText gallery. The Quick Parts gallery would also work.
- Optionally, add this entry to a new or different category. We’ll keep this one in General, although you could create categories to organize, like Contracts, Clients, or Marketing.
- Add a short description that will be a screen tip when you hover over available AutoText entries. For my example, I’ll use Columbine Hills logo & address.
- Choose Save In. Your options are to save in the normal template or Normal.dotm file, which stores your customization, such as layout changes, macros, and other settings specific to you, or the Building Blocks.dotx file.
Tip: Choose the Normal.dotm if you’d like to re-play AutoText entries by typing in the shortcut or abbreviation (see below). If you’re creating AutoText entries you’d like to share with other people in your organization, choose instead the Building Blocks file, which could be copied to another computer without sharing your other custom settings. - Press OK to complete.
Using AutoText Entries
Next, let’s look at how you can easily add your AutoText entries to a Word document.
How to use an AutoText entry:

- Move to a location where you want to bring in the AutoText content.
- Use one of these 4 ways to add an entry:
- Insert > Quick Parts > AutoText. Pick your entry from the list.
- Type the shorthand entry you created, such as CHAddress. Don’t type a space or punctuation. If your AutoText entry is at least 4 characters long and AutoComplete is enabled (see below), Word displays an AutoComplete suggestion you can pick from to insert the AutoText entry.
- Type the shorthand and press the F3 function key, whether or not you see the AutoComplete prompt.
- Add the AutoText to the Quick Access Toolbar. (The specific steps to work with the Quick Access Toolbar are covered at the 5:53 time code in the above video).
There is a 5th method for customizing the Ribbon, but it’s more involved than you’ll likely need.
If the AutoComplete feature doesn’t work, your entry is less than 4 characters, it wasn’t stored in the Normal.dotm file, or the AutoComplete feature is not enabled.
To confirm AutoComplete is turned on:
- Choose File > Options > Advanced.
- Move to the Editing options section.
- Click/turn on Show AutoComplete suggestions.
Editing Your Word AutoText Entries
What if you need to change an AutoText entry you’ve created?
To Change the Content of an AutoText Entry:
- Select the new or changed text or graphics.
- Repeat the steps you used before to create the AutoText entry and use the same name.
- Word will prompt you to redefine the building block entry. This does not change any documents that contain the content of the previous AutoText entry.
How can you change the properties of an existing AutoText entry, such as the name or description?
To Rename, Update, or Delete a Word AutoText entry:
- On the Insert tab, in the Text group, click Quick Parts, and then click Building Blocks Organizer.
- Click the name of the building block you want to rename, and then click Edit Properties.
- In the Modify Building Block dialog box, type a new name for the entry, and then click OK.
- When asked whether you want to redefine the building block entry, click Yes.
You can also delete an AutoText entry from this location.
Saving Your Work
When you close Word, you’ll likely see an option enabled to prompt you to save the Normal template or the Building Blocks template. If you see that, simply pick Save.
AutoText entries in Microsoft Word are a great way to save time and reduce errors when adding text and content to your documents. How will you use the Word AutoText feature? Discover more ways to save time editing and formatting your Word documents at: TheSoftwarePro.com/Word.
© Dawn Bjork, MCT, MOSE, CSP®, The Software Pro®
Microsoft Certified Trainer, Productivity Speaker, Certified Speaking Professional