One of the best things about Microsoft OneNote is its flexible notebook structure. Think of a OneNote notebook as a 3-ring binder, where sections are dividers or at the top level. You can create sections for different projects, topics, classes, people, customers, or any way you like to organize your information. Each section contains pages with your notes.
Let’s look at ten tips to work with Microsoft OneNote more effectively by managing notebook sections. Read my article below or watch the video:
1. Adding a Section
To add a new section:
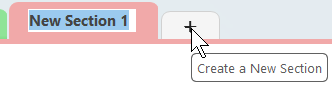
- Create a new section to a notebook by clicking the + button on the sections tabs area.
-OR- - Right-click anywhere in the section tabs and then left-click on New Section.
-OR- - Right-click on any section tab and then left-click on New Section.
New sections will appear as tabs where you can type a new name.
Bonus Tip: To rename, delete, move, or copy sections, right-click on the section tab you want to manage.
2. Renaming a Section
Section names and page titles are searchable, so make them meaningful and descriptive to find information quickly.
To rename a section tab:
- Right-click on the section tab and choose Rename.
3. Deleting a Section
To delete a section tab:
- Right-click on the section tab and choose Delete.
4. Moving or Copying a Section
To move or copy a section from one notebook to another notebook:
- Right-click on the section tab and choose Move or Copy.
- Select the location in a notebook where you want to move or copy the section.
- Choose Move or Copy. Note: I prefer the Copy action so I can confirm that the section moved to the correct location. Then, delete the original section.
-OR-
- To move a section, drag and drop the desired section tab from the top of the page to a notebook listed at the left of the OneNote window. Or, open the notebook in another window first.
Tip: To copy, hold down the [Ctrl] key and drag the section tab to another notebook.
5. Merging Sections
Use the merge option if you have notes in one section that you’d like to combine into a section of the current or other notebook. Merge differs from the move or copy options because you combine two sections into one.
To merge notes from one section into another:
- Right-click on the section tab.
- Pick Merge into Another Section.
- Click the plus button for the destination notebook and select the section that will “receive” the content from the current section.
- Choose Merge. The sections are merged, and the pages from the original section are displayed in the destination section.
- After the merge is complete, you will be prompted if you want to delete the original section.
6. Using Vertical Tabs
One of the fairly recent updates to the OneNote desktop app is to display the sections as Vertical Tabs. In some versions of OneNote, this is the default, even for the desktop app.
To view sections as Vertical Tabs:
- Choose View > Tab Layout > Vertical Tabs. Changing to vertical tabs in the desktop app more closely matches OneNote for the Web.
- Repeat these steps to change back to Horizontal Tabs.
Check out my article and video on vertical tabs.
And here’s a bonus tip: Another change in OneNote is the switch to the Simplified Ribbon which more closely matches the browser version. If you’d like to revert back to the more detailed ribbon in previous versions, right-click on the ribbon and pick Classic Ribbon.
7. Changing Section Color
To change the color of the section:
- Right-click the section tab and pick Section Color. Choose a color from the menu.
8. Creating Section Groups
If you accumulate too many notebooks with too many sections inside each notebook, use Section Groups to nest a multi-level hierarchy of sections within one notebook.
To create a section group:
- Right-click in the section navigation area and choose New Section Group.
- Name the section group to describe the sections that will be moved to or created in this group.
- Drag sections into your new group.
- Click the up arrow to navigate back to the top level.
- Click the section group name to see the sections stored under the group.
9. Password Protecting Sections
When working with a shared OneNote notebook, you can limit access to specific sections by adding a password.
To set a password for a specific section in a notebook:
- Right-click the section tab and select Password Protect This Section.
- The Password Protection pane will open on the right side of the screen.
- Click the Set Password button.
- Remember that passwords are case-sensitive, and using the same password throughout is helpful if you are protecting multiple sections.
Definitely don’t use a password you might have for other computer operations. And if you forget the password, your IT group or help desk cannot unlock a section. - Enter a password and confirm it.
- Click OK.
You might notice that the section still remains available for a while, even when you apply a password.
However, you can lock all password-protected sections anytime by clicking the Lock All button or pressing [Ctrl] + [Alt] + L.
To remove password protection:
- Open the Password Protection pane as described in the steps above.
- Click Remove Password. Enter the current password, then click OK.
Another option is to change the behavior of section passwords, for instance, how quickly a protected section is locked.
Read my article or watch the video on working with OneNote section passwords to learn more.
To modify the behavior of section passwords:
- Choose File > Options > Advanced > Passwords.
10. Linking to a Section
Section links are handy for creating an interactive table of contents that others can use to navigate within your notebook. Or create a link to share the notebook section by email.
To create a link to a section:
- Right-click the tab of the section you want to point to.
- On the shortcut menu, click Copy Link to Section.
- The link to the selected section and the title of the section are copied to the Clipboard.
- Click the location on the page where you want to add the link.
- Right-click and choose Paste from the shortcut menu or use other paste options such as [Ctrl]+V.
- OneNote inserts a link that, when clicked, displays the target section.
It’s good to know that the reason for sharing a section link is to create more straightforward, direct navigation when sharing a notebook. The user still has access to all the other content in the notebook.
Which of these tips will you use to organize your sections in OneNote?
Find other time-saving Microsoft OneNote shortcuts, tips and tricks at TheSoftwarePro.com/OneNote.
© Dawn Bjork, MCT, MOSM, CSP®, The Software Pro®
Microsoft Certified Trainer, Productivity Speaker, Certified Speaking Professional