Quick Overview:
Learn how to use Microsoft Word bookmarks to mark key locations and quickly navigate long documents. This guide shows how to create, manage, and link bookmarks, making it easier to find information, build cross-references, and stay organized when working with complex documents.
 Microsoft Word's electronic bookmarks work like a paper bookmark in printed materials; they easily mark a place you want to find again. Word bookmarks can be a handy option to:
- Navigate to specific locations in a lengthy document.
- Mark index entries that cross multiple pages.
- Bookmarks are also one of the primary ways to create a cross-reference in a Microsoft Word document.
A cross-reference creates an automatic, updated reference to a defined item in a document. For instance, see Table on Page 10.
In this article, you'll learn how to create bookmarks, navigate to Word bookmarks, display bookmarks onscreen, and delete bookmarks you no longer need. Or watch this video to find out how you can use bookmarks in your long Word documents:
Creating Word Bookmarks
How to insert a bookmark in your Word document:
- Select the text you want to bookmark. The highlighted text is the location of the bookmark. If the text moves as you edit, the bookmark stays with the text.
You can also create a bookmark without selecting text: However, it's a little easier to keep track of your bookmarks if you choose a section of text. A bookmark is less likely to be accidentally deleted if it contains more than a space between words. A bookmark could include multiple lines of text or even more than one page of content.
- Next, go to Insert > Bookmark (this option is found in the Links group). The Bookmark dialog box opens.
- In the Bookmark name box, type a name for the bookmark.
TIP: When naming a bookmark, use a descriptive name for the location in the text or type of reference. Bookmark names need to begin with a letter. They can include numbers and letters, but Word doesn't let you use spaces in your bookmark name. To separate words, you can use underscores. - Finally, choose Add to close the dialog box. Your bookmark is ready for use.
Bookmarks don't display when you print the document; they're simply reference points that let you jump instantly to places you want to return to most often.
Jumping to Bookmarks
To move to a bookmark:
 Press the [F5] function key or use the keyboard shortcut, [Ctrl]+G, to open Go To.
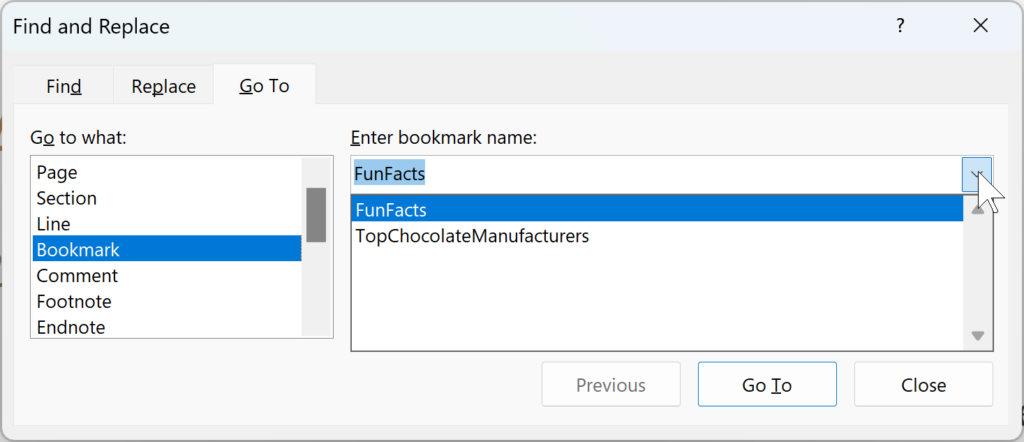
You can also locate Go To under the Find option in the Home tab of the Ribbon.- From the Go to what list, take a moment to review the many document elements that you can move to with the Go To command.
- Select Bookmark. The drop-down list at the right shows all the bookmarks in your document. Select one, and then click the Go To button.
Your document scrolls to put the highlighted, bookmarked text at the top of your screen. - Click Close to hide the dialog box.
 Press the [F5] function key or use the keyboard shortcut, [Ctrl]+G, to open Go To.
Linking to a Bookmark
You can also add hyperlinks that will take you to a bookmarked location in the same document.
- Select the text or object you want to use as a hyperlink.
- Insert > Link. Under Link to, click Place in This Document.
- Select the heading or bookmark from the list you want to link to. Headings are listed if the document headings or main titles are formatted with styles.
- Pick the bookmark that you want to link to from the selected text.
- Confirm or change the text at the top for the Text to display section.
- Choose OK to create the link.
- Hover over the link to view the linked bookmark. Next, press [Ctrl]+Click to test and move to the bookmark.
Displaying Bookmarks
By default, bookmarks are invisible in your documents because they do not print and might be distracting when editing a document. However, you may find it helpful sometimes to see bookmarks in your document.
To see Word bookmarks in your text:
- Choose the File tab.
- Pick Options.
- Choose the Advanced tab.
- Scroll down to the options under Show document content and click the Show bookmarks checkbox.
If you add a bookmark to a block of text or other items like an image, the bookmark appears in brackets, such as [bookmark]. If you didn't select anything when you added the bookmark (meaning you just placed your cursor in an area), the bookmark appears as an I-beam.
Deleting Bookmarks
Deleting bookmarks is easy if you no longer need them in a document.
To delete a bookmark:
- Choose Insert > Bookmark.
- If you have many bookmarks, pick either Name or Location to sort the list of bookmarks in the document.
- Finally, click the name of the bookmark you want to delete, and then choose Delete.
If you have created a hyperlink to the deleted bookmark, right-click the linked text and then pick Remove Hyperlink.
And that's our look at how to create and manage bookmarks in a Microsoft Word document. So how will you work with Word bookmarks in your long documents?
Discover more ways to save time editing and formatting your Word documents at TheSoftwarePro.com/Word.
© Dawn Bjork, MCT, MOSE, CSP®, The Software Pro®
Microsoft Certified Trainer, Productivity Speaker, Certified Speaking Professional